本章的内容主要说明如何在JavaFramework层和Native层自定义Client-Server组件,并且使用Binder进行通信。
一、Native Binder
源码目录结构:
alps/frameworks/native/cmds/NativeBinderDemo/
|
|
1.1 服务端
alps/frameworks/native/cmds/NativeBinderDemo/ServerDemo.cpp
获取ServiceManager,注册service.myservice服务到ServiceManager,启动服务。
|
|
1.2 客户端
alps/frameworks/native/cmds/NativeBinderDemo/ClientDemo.cpp
获取ServiceManager,拿到service.myservice服务,再进行类型转换成IMyService,最后调用远程方法sayHello()
|
|
1.3 MyService
alps/frameworks/native/cmds/NativeBinderDemo/IMyService.h
申明IMyService,申明BpMyService(Binder客户端),申明BnMyService(Binder的服务端)。
|
|
alps/frameworks/native/cmds/NativeBinderDemo/IMyService.cpp
|
|
1.4 Android.mk
|
|
1.5 原理图

1.6 运行
编译:
mm alps/frameworks/native/cmds/NativeBinderDemo目录,然后到alps/out/target/product/{Project}/system/bin/会生成ClientDemo和ServerDemo
执行:
开两个窗口分别执行下面两个命令便可以看到结果了:adb shell system/bin/ServerDemo , adb shell system/bin/ClientDemo
二、JavaFramework Binder
源码目录结构:
alps/frameworks/base/cmds/FrameworkBinderDemo/
|
|
2.1 Server端
(1)ServerDemo.java
可执行程序
|
|
(2)IMyService.java
定义sayHello()方法,DESCRIPTOR属性
|
|
(3)MyService.java
|
|
(4) Android.mk
|
|
(5) ServerDemo
|
|
2.2 Client端
(1)ClientDemo.java
可执行程序
|
|
(2)IMyService.java
与Server端的IMyService是一致,基本都是拷贝一份过来。
(3)MyServiceProxy.java
|
|
(4) Android.mk
|
|
(5) ClientDemo
|
|
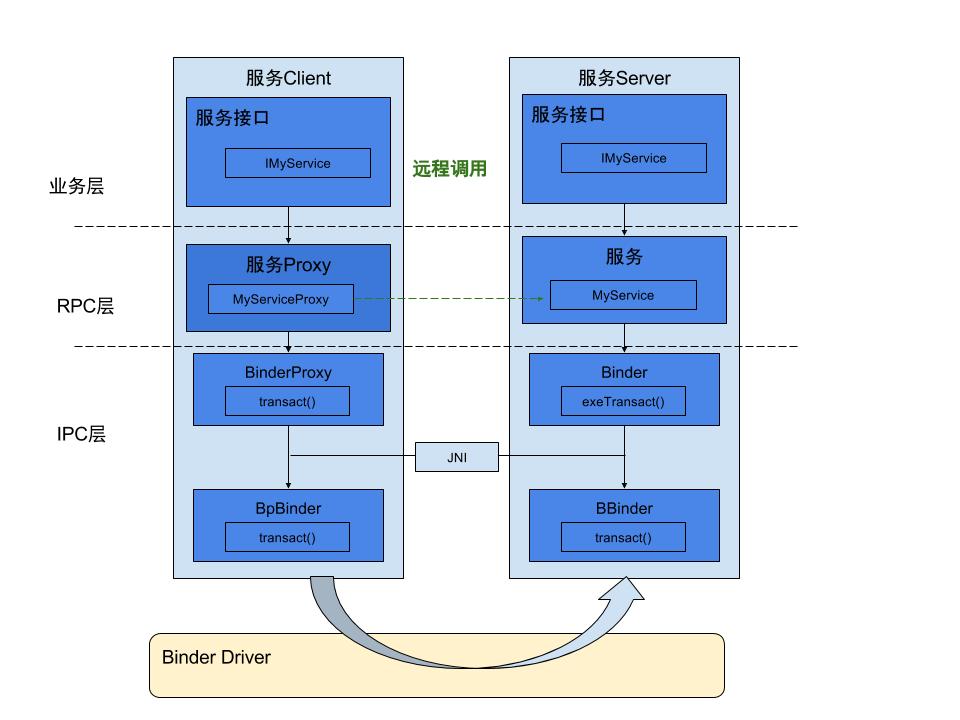
2.3 原理图
2.4 运行
编译:
mm alps/frameworks/base/cmds/FrameworkBinderDemo/目录,然后:
alps/out/target/product/{Project}/system/bin/ 生成ClientDemo和ServerDemo
alps/out/target/product/{Project}/system/framework/ 生成ClientDemo.jar和ServerDemo.jar。
执行:
|
|
开两个窗口分别执行下面两个命令便可以看到结果了:
adb shell system/bin/ServerDemo , adb shell system/bin/ClientDemo